
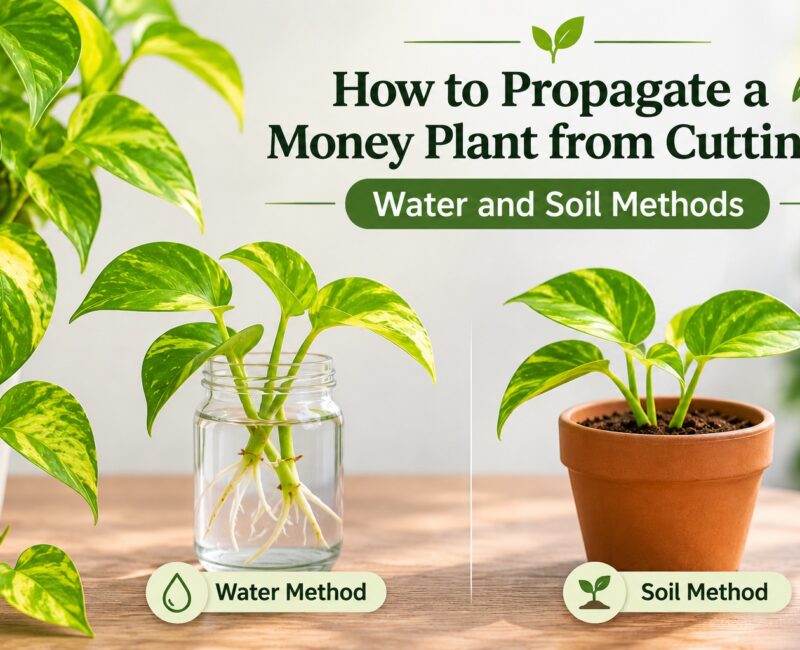
Learning how to propagate a money plant is one of the cheapest ways to fill your home with greenery, because a single healthy vine can give you several new plants. The method is simple: take a stem cutting with a leaf joint, root it, and pot it up. What trips people up is the detail, such as where to cut, whether to use water or soil, and how long to wait. This guide covers both methods step by step, plus layering, troubleshooting and tips for the cooler months across India.
Quick Answer: How Do You Propagate a Money Plant?
To propagate a money plant, cut a healthy stem just below a leaf joint (a node), remove the lowest leaves, and root the cutting in water or moist, free-draining compost in bright, indirect light. Roots usually form from the node within weeks, though timing varies. Pot water-rooted cuttings into compost once roots are established, and keep the new plant moist but never soggy.
In This Guide
- Which plant does this apply to?
- Best time to take cuttings
- What you need
- How to choose and cut a stem
- Method 1: Rooting in water
- Method 2: Rooting in compost
- Method 3: Layering
- Water vs soil: which should you choose?
- Potting up and aftercare
- Troubleshooting
- Propagating in India’s cooler months
- Safety: toxic sap and pets
- Frequently asked questions
- Sources
Which Plant Does This Apply To?
In most Indian homes, “money plant” means Epipremnum aureum, also called golden pothos or devil’s ivy. The steps below are written for that climbing, heart-shaped-leaf vine. The name “money plant” is also used for other species, such as the Chinese money plant (Pilea peperomioides) and the jade plant (Crassula), which are propagated differently, so check what you have first. Our guides to types of money plants and how to care for them and different types of money plants can help you identify yours.
The Royal Horticultural Society (RHS) notes that epipremnum is very easy to propagate because its stems form roots readily at the leaf joints. That is what makes the plant such a good beginner project.
Best Time to Take Cuttings
The RHS recommends late spring or early summer for houseplant stem cuttings, when plants are growing actively. It also says cuttings can succeed for most of the year, so a stem that breaks off in another season is still worth trying. If you are reading this in the cooler months, you can still propagate, but read the section on India’s cooler months first and expect slower progress.
Take cuttings only from a healthy plant. Choose stems the plant can spare that are free of pests and disease. If your plant itself is struggling, fix that first; our guide to money plant yellow leaves will help you work out why.
What You Need
- Clean, sharp scissors or secateurs
- A clear glass or jar for the water method
- A small pot with drainage holes and moistened, free-draining compost for the soil method
- Gloves, because the plant is toxic and can irritate skin (see safety)
- Optional: rooting hormone. The New York Botanical Garden’s library notes it is often unnecessary, and the University of Vermont Extension calls it optional and says to follow the package directions if you use it.
- Optional: a clear plastic bag, inverted jar or humidity dome for cuttings in compost
How to Choose and Cut a Stem
A node is the bump on the stem where a leaf joins it, and it is where the new roots will form. Every cutting needs at least one.
- Pick a long, healthy stem. Look for firm, green growth with several leaves.
- Cut just below a node. The RHS advises cutting just below a leaf joint, which gives a piece of roughly 8 to 10 cm. The University of Vermont Extension suggests a tip cutting of about 3 to 6 inches (7.5 to 15 cm) with several nodes.
- Strip the lower leaves. The RHS suggests removing the lower leaves and leaving two or three at the top. Vermont’s guidance for water rooting is to strip the leaves from one or two nodes at the bottom, so nothing sits in the water.
- Use clean tools. Wipe your scissors before cutting so you do not carry disease between plants.
The RHS notes that tips pruned to shape the plant can double as cuttings, so you can combine a trim with propagation.
Method 1: Rooting in Water
Water is the most popular method for money plants because you can watch the roots develop.
- Fill a clear glass or jar with room-temperature water.
- Stand the prepared cutting in it so the node or nodes are underwater and every leaf stays above the surface. The RHS says to keep the water level just below the leaves.
- Place it in a bright spot out of direct sun. Both the RHS and the University of Vermont Extension recommend bright, indirect light. Warmth helps, according to the RHS.
- Change the water if it turns cloudy, using fresh room-temperature water, as Vermont’s guidance advises.
- Wait. The RHS gives about three to four weeks as a general guide for houseplant cuttings, while Vermont notes rooting can take days, weeks or sometimes months depending on the plant, light and conditions.
- Pot it up once roots have formed and are growing (see potting up).
Method 2: Rooting in Compost
Rooting straight into compost saves you a transplanting step.
- Fill a pot that has drainage holes with moistened, free-draining mix. For a general houseplant mix, the RHS suggests equal parts peat-free multipurpose compost and perlite, and adds that locally sourced grit or gravel is now preferred to perlite for environmental reasons.
- Make a hole with a pencil, insert the cutting, firm the mix around it, and water lightly. The RHS advises positioning the leaves just above the surface.
- If you like, cover the pot with an inverted jar, clear bag or humidity dome. Vermont’s guidance is to open the cover to let air circulate if moisture drips from it.
- Keep the mix moist but not wet and do not let the cutting dry out.
- Place in bright, indirect light.
- Check for rooting. New growth suggests roots have formed, and Vermont says a gentle tug that meets resistance is a good sign.
Method 3: Layering
Layering is a gentler option because the stem stays attached to the parent plant while it roots. The RHS describes pinning a trailing stem into a pot of free-draining compost beside the parent. Roots form at the leaf joint where the stem touches the compost, and once rooted you can cut the new plant free.
Layering suits plants that are trailing from a shelf or hanging basket, and it removes the risk of a cutting drying out. It does take a spare pot and a little more space.
Water vs Soil: Which Should You Choose?
The University of Vermont Extension says the choice is largely a matter of preference, and that vining plants such as pothos root easily in water. Here is how the two compare.
| Water | Compost | |
|---|---|---|
| Seeing progress | You can watch roots grow | Hidden; check for new growth or a gentle tug |
| Transplanting | Needed once roots form | Not needed |
| Main upkeep | Replace cloudy water | Keep moist, not wet; ventilate any cover |
| Best for | Beginners who like to see results | Growers who want the fewest steps |
Many people in India keep money plants in water-filled bottles for decoration. If you want to explore that, see our guide to houseplants that thrive in water. This article focuses on rooting cuttings and then potting them into compost, which is the approach the RHS describes.
Potting Up and Aftercare
- When to pot up. Vermont’s guidance for water-rooted cuttings is to pot them once the roots reach about 2 to 3 inches (5 to 7.5 cm). The RHS says to pot water-rooted cuttings once they have developed roots and are growing.
- Pick a small pot. The RHS suggests a pot about 8 to 10 cm wide with drainage holes, filled with peat-free multipurpose compost. An oversized pot holds too much wet soil around young roots.
- Keep it evenly moist. Water after potting, then aim for moist, never soggy. Our guide to money plant yellow leaves explains how overwatering shows up.
- Give bright, indirect light. The RHS advises bright light without direct sun for epipremnum.
- Pinch out tips later. Once the cutting is growing well, the RHS suggests pinching out the growing tips to encourage side shoots and a bushier plant.
- Add support or let it trail. For ideas, see our balcony money plant climbing ideas.
Troubleshooting
| Problem | Possible cause | What to do |
|---|---|---|
| No roots after several weeks | Cool conditions, low light, or simply more time needed | Move to a warmer, brighter (not sunny) spot and keep waiting; rooting can take weeks to months |
| Water turns cloudy | Debris or decay in the water | Replace with fresh room-temperature water |
| Stem turns soft, dark or mushy | Rotting | Discard the affected section, cut a fresh healthy piece with clean scissors and start again |
| Cutting in compost wilts | Mix too dry, or too much air movement | Water lightly and cover loosely, opening the cover if moisture drips |
| Leaves yellow after potting up | Too much water, low light or a cold draught | Check the soil and the position, and see our yellow leaves guide |
If a cutting rots, do not feel bad about it. Taking several cuttings at once improves your odds.
Propagating in India’s Cooler Months
The RHS says cuttings are best taken when plants are actively growing, but that they can work for much of the year. As winter arrives in many parts of India, growth slows, so expect rooting to take longer than the typical three to four weeks the RHS mentions. That is a reasonable inference rather than a measured figure for money plants, so treat any timeline as a guide.
- Keep it warm. The RHS recommends keeping epipremnum between roughly 18 and 30°C. Avoid a cold windowsill at night, where a jar of water can chill quickly, and keep it away from heaters and AC vents.
- Use the brightest indirect light you have. Winter light is weaker.
- Be patient and avoid overwatering the compost cuttings. Cool weather slows evaporation, so check before adding more water.
- Take extra cuttings as insurance.
Safety: Toxic Sap and Pets
The RHS advises wearing gloves when taking epipremnum cuttings, because the plant is toxic and can irritate the skin. The ASPCA lists it as toxic to dogs and cats because of insoluble calcium oxalates, with signs that include mouth irritation, drooling, vomiting and difficulty swallowing.
Keep jars, pots and trimmings out of reach of pets and children, and wash your hands after handling the plant. If a pet or child chews any part of it, contact a vet or doctor promptly. For safer alternatives, see our guide to non-toxic houseplants and our list of toxic plants to keep away from pets and kids.
Common Mistakes to Avoid
- Cutting between nodes, so the cutting has no leaf joint to root from.
- Leaving leaves under the waterline, where they can decay.
- Using direct sun, which can overheat a jar and scorch leaves.
- Taking cuttings from a sick or pest-ridden plant.
- Moving rooted cuttings into a very large pot.
- Giving up too early. Rooting can take weeks or longer.
For broader houseplant troubleshooting, read why houseplants keep dying.
Frequently Asked Questions
Can I propagate a money plant from a single leaf?
The recommended method uses a stem section with a leaf joint, because that is where roots form. The RHS describes cuttings taken just below a leaf joint, so a bare leaf blade without a node is not the method to rely on.
How long does a money plant cutting take to root?
There is no single answer. The RHS gives about three to four weeks as a general guide for houseplant cuttings, and the University of Vermont Extension says rooting can take days, weeks or sometimes months. Warmth, light and the time of year all play a part.
Do I need rooting hormone?
No. The New York Botanical Garden’s library says it is often unnecessary, and Vermont’s extension calls it optional. If you choose to use it, follow the product’s instructions.
Is water or soil better for propagating a money plant?
Neither is clearly better. Vermont’s extension says the choice is mostly preference, with water letting you watch roots form and soil avoiding a transplant step. Pick the one that suits you.
Is it safe to handle money plant cuttings?
Handle them with care. The RHS says the plant is toxic and can irritate the skin, so wear gloves, wash your hands afterwards and keep everything out of reach of pets and children.
Conclusion
To propagate a money plant, choose a healthy stem, cut just below a node, and root it in water or compost in bright, indirect light. Water lets you watch the roots form, compost saves a step, and layering is a low-risk option for trailing stems. Be patient, keep cuttings warm and out of direct sun, and pot up into a small pot once roots are established. Start two or three cuttings at once and you will almost always end up with a new plant to keep or share.
Sources
- RHS: How to grow epipremnum
- RHS: How to take cuttings from houseplants
- University of Vermont Extension: More, Please: Propagating Houseplants (December 2022)
- New York Botanical Garden Mertz Library: How can I propagate my houseplants?
- ASPCA: Golden pothos toxicity