The average 4×4 SFG bed gives you 16 squares of growing space. Add a trellis to the back of that bed and you can grow cucumbers, beans, and peas vertically effectively doubling your usable growing area without expanding your footprint. Add a hoop tunnel and those same 16 squares become a three-season growing system. Add an archway and your garden path becomes productive growing space.
Vertical and covered structures are where SFG transitions from a good method to a great one. And the best news: most of these builds cost between $10 and $40 and take an afternoon.
This guide covers three distinct structures trellises, hoop tunnels, and archways with step-by-step build instructions and the crops that make them most worthwhile.
Why Vertical Growing Transforms a Square Foot Garden
Before the builds, it’s worth understanding the logic:
Space multiplication: A trellis supporting a cucumber plant growing 5 feet tall occupies 1 square of bed space but produces as much as 3–4 in-ground plants in a row garden. Vertical growing is the highest-ROI technique in a small garden.
Airflow and disease prevention: Vertical crops dry faster after rain, reducing fungal disease pressure. Squash, cucumbers, and tomatoes grown vertically are significantly less prone to mildew than sprawling plants.
Shade management: A trellis on the north side (or south side in the Southern Hemisphere) of a bed creates a shade zone beneath it perfect for heat-sensitive crops like lettuce and spinach during summer.
Harvest ease: Vertical crops are easy to spot and harvest. No crouching under sprawling vines, no missed cucumbers hidden in ground-level foliage.
Structure 1 The SFG Trellis
What It Is
An SFG trellis is a vertical support structure typically running the length of one side of the bed that allows climbing and vining crops to grow upward rather than outward. It’s the most common vertical addition to an SFG setup.
Best Crops for SFG Trellises
| Crop | Trellis Height Needed | Squares Used | Yield Per Vertical Plant |
|---|---|---|---|
| Pole beans | 5–6 ft | 8 per sq ft | High |
| Cucumbers | 4–6 ft | 2 per sq ft | High |
| Peas (tall) | 4–5 ft | 8 per sq ft | Moderate-High |
| Indeterminate tomatoes | 5–6 ft | 1 per sq ft | Very High |
| Small melons | 5–6 ft | 1 per sq ft | Moderate |
| Sweet peas (ornamental) | 4–6 ft | 8 per sq ft | n/a |
How to Build a Basic SFG A-Frame Trellis
Materials:
- 4× wooden stakes or bamboo canes (6 ft long)
- Garden twine or netting (4×4 ft section)
- 4× screws or cable ties
- Optional: 2 short horizontal crossbars (1 ft) for rigidity
Cost: $5–15
Build Steps:
Step 1 Set Posts Push two 6-ft stakes firmly into opposite ends of your bed (or just outside the bed wall if you don’t want to penetrate the growing medium). For a 4×4 bed, place them at the two back corners (north end of the bed).
Step 2 Add Crossbars (Optional) Attach a short horizontal bar at the top and optionally mid-height to create a more rigid frame. Secure with screws or cable ties.
Step 3 Attach Netting or String Run garden netting horizontally between the two posts. Space horizontal strings 6 inches apart for climbing crops. Alternatively, use a pre-made section of plastic or jute garden netting stapled or tied to the frame.
Step 4 Guide Young Plants As seedlings emerge, guide the first 4–6 inches of stem to the netting. Most climbing crops will self-attach via tendrils after that.
Pro tip: Position the trellis on the north side of your bed (south side in Southern Hemisphere) so it doesn’t shade your low-growing crops unnecessarily unless you specifically want that shade for heat-sensitive plants.
Upgrade Option: PVC Pipe Trellis Frame
For a more durable, reusable trellis:
Materials:
- 4× ½-inch PVC pipes (6 ft length)
- 2× ½-inch PVC T-connectors
- PVC cement or friction fit
- Netting or twine
- 4× rebar stakes or ground anchors
Cost: $15–25
Insert rebar stakes into the ground at each corner of the trellis footprint. Slide PVC pipes over the rebar for secure, removable posts. Connect with a horizontal top bar via T-connectors. Attach netting. This structure can be disassembled each winter and reassembled in spring.
Structure 2 The Hoop Tunnel
What It Is
A hoop tunnel is an arched structure of flexible hoops installed over an SFG bed that supports coverings frost fleece, shade cloth, insect netting, or polytunnel plastic depending on the season. It converts a standard raised bed into a protected growing environment.
This is the highest-impact single structure for season extension. A hoop tunnel can add 4–8 weeks to both ends of your growing season.
Hoop Tunnel Options by Material
| Hoop Material | Cost | Durability | Best Cover | Best For |
|---|---|---|---|---|
| ½-inch PVC pipe | Very Low ($5–10) | 2–4 seasons | Fleece, shade cloth | Budget builds |
| 9-gauge galvanised wire | Low ($8–15) | 3–5 seasons | Insect netting | Lightweight covers |
| Fibreglass rods | Moderate ($15–25) | 5–10 seasons | All cover types | Long-term beds |
| Electrical conduit | Moderate ($20–30) | 10+ seasons | All cover types | Permanent setup |
How to Build a PVC Hoop Tunnel (4×4 or 4×8 Bed)
Materials (4×8 bed):
- 4–5× ½-inch PVC pipes, 10 ft long (will arch to ~24 inches height)
- 8–10× rebar pins (12 inches long) OR purpose-made hoop tunnel stakes
- 1 roll frost fleece or polytunnel plastic (cut to 6×10 ft for a 4×8 bed)
- Binder clips or purpose clips to attach cover to hoops
Cost: $15–30
Step 1 Insert Rebar Pins Push rebar pins 6 inches into the soil outside the bed frame, in opposing pairs every 24 inches along the length of the bed. Leave 6 inches of rebar exposed above the bed wall.
Step 2 Bend Hoops Slide each end of a PVC pipe over opposing rebar pins to form an arch. The pipe will naturally curve into a semi-circle. Repeat for all hoop positions.
Step 3 Attach a Ridge Pole (Optional) Run a length of PVC or twine along the top of all hoops from end to end, tying to each arch. This prevents the structure from racking in wind.
Step 4 Drape and Secure Cover Lay your chosen cover material over the hoops with equal overhang on all sides. Secure by burying the edges in the soil, weighing with stones, or clipping to the bed frame with binder clips.
Seasonal cover rotation:
- Spring/Autumn: Frost fleece (2-oz weight for extra protection)
- Summer: 30–50% shade cloth
- Pest season: Fine insect mesh (keeps cabbage white butterflies, carrot fly off crops)
Structure 3 The Garden Archway
What It Is
A garden archway spans a garden path and provides a growing surface above the walkway turning dead overhead space into productive growing area. Trained with climbing vegetables or ornamental climbers, an archway creates one of the most visually striking features in an SFG setup while producing food or flowers.
What to Grow on an SFG Archway
Productive options:
- Climbing beans (runner beans, borlotti) fast, productive, attractive
- Cucumbers high yields, good shade below
- Small squash (delicata, acorn) support fruit in slings
- Kiwi (ornamental × productive over multiple seasons)
Ornamental options:
- Sweet peas fragrant, cottage garden aesthetic
- Morning glory fast cover, striking colour
- Nasturtiums edible and ornamental
How to Build a Simple PVC Archway
Materials:
- 2× 10-ft lengths of 1-inch PVC pipe
- 2× 4-ft lengths of rebar (or purpose-made ground stakes)
- 1 length of wood or PVC for the crown crossbar
- Garden netting or twine (6×6 ft section)
- Cable ties
Cost: $20–40
Step 1 Set Rebar Anchors Drive rebar 18–24 inches into the ground on each side of the path at the archway position. Leave 6–8 inches exposed.
Step 2 Fit PVC Arches Slide one end of each 10-ft PVC pipe over opposing rebar stakes. Bend the pipe to form an arch over the path and push the other end onto the opposing stake. Adjust height by varying how deep the rebar is driven.
Step 3 Add Crossbar Attach a horizontal bar at the crown of the arch for rigidity. Cable tie or screw to the arch legs.
Step 4 Add Netting Attach garden netting across both sides and the top of the arch for climbing plants to grip. Pre-tied horizontal strings at 6-inch intervals also work well.
Step 5 Plant and Train Plant climbing crops at the base of each arch leg (inside or just outside the arch footprint). Guide initial growth toward the structure. Most vining plants self-attach within a week.
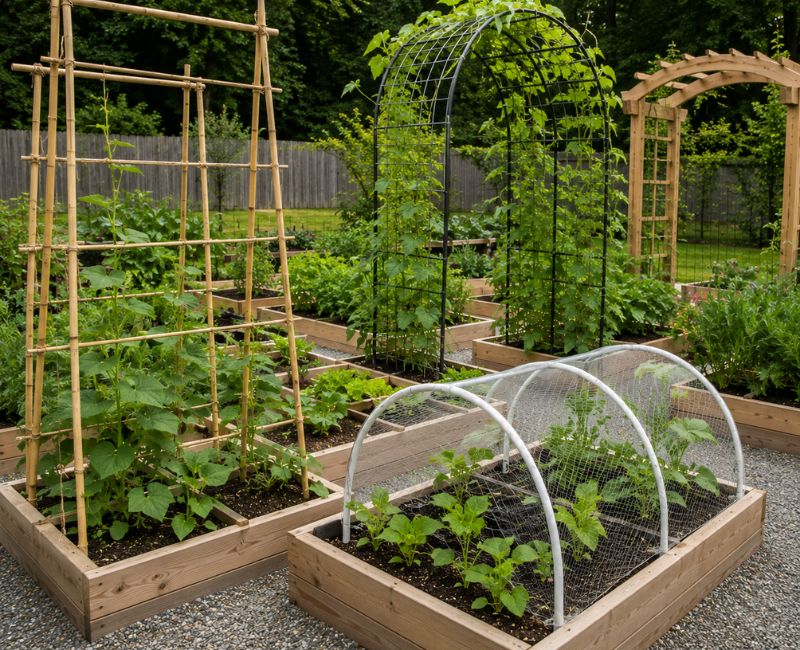
Combining All Three: The Full SFG Vertical System
A fully equipped SFG bed with all three structures in place:
- Trellis at the back (north end) of the 4×8 bed for tomatoes, cucumbers, and beans
- Hoop tunnel running the full length of the bed covers swapped by season
- Archway at the entrance to the growing area runner beans in summer, sweet peas in spring
This combination gives you: vertical growing space, full-season crop protection, and a visually distinctive kitchen garden that works as hard as it looks.
Explore the full SFG series: All-New Square Foot Gardening 4th Edition | SFG Plans for Extreme Weather — hoop tunnel integration | Top Hats for Root Crops | Square Foot Gardening vs Row Gardens
Conclusion
Trellises, hoop tunnels, and archways aren’t extras they’re the structures that make a Square Foot Garden perform at its full potential. They extend your season, multiply your growing space, protect your crops, and turn a functional raised bed into a genuinely beautiful growing space.
Start with a hoop tunnel if season extension is your priority. Add a trellis if you’re growing tomatoes, cucumbers, or beans. Build an archway if you want a feature that earns its space every single season.
Continue the SFG series: Mel’s Mix Alternatives for Your Bed | Square Foot Garden Plans for Extreme Weather | Top Hats for Root Crops.